This is part two of a series of blog posts on using the WPF list box. In this post you change a list box to display rows horizontally instead of vertically. You learn to change list box templates dynamically at runtime. Finally, you learn to pass multiple pieces of data from your data source to a converter class and have that class return a single piece of data to be displayed.
Before reading this blog post, it is recommended you read my blog post Using WPF List Controls - Part 1 so you can learn about the data layer used in this blog post and review how WPF list controls work.
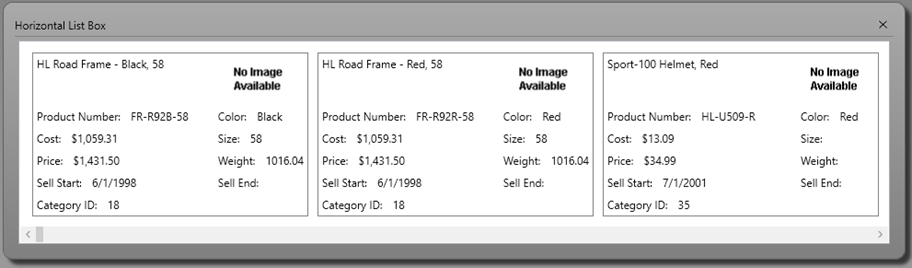
Horizontal List Box
One of the easiest things you can do to change the look of a list box control is to display each row horizontally instead of vertically (see Figure 1). Each list box has an ItemsPanel element. This element is responsible for how each list item is displayed. By default, it uses a StackPanel control with the Orientation property set to "Vertical". You can override this element to use a horizontal stack panel (Figure 1) as shown in the code below.
<ListBox Grid.Row="1"
    ItemTemplate="{StaticResource ProductLargeTemplate}"
    ItemsSource="{Binding Source={StaticResource viewModel},
                          Path=Products}">
  <ListBox.ItemsPanel>
    <ItemsPanelTemplate>
      <StackPanel Orientation="Horizontal" />
    </ItemsPanelTemplate>
  </ListBox.ItemsPanel>
</ListBox>
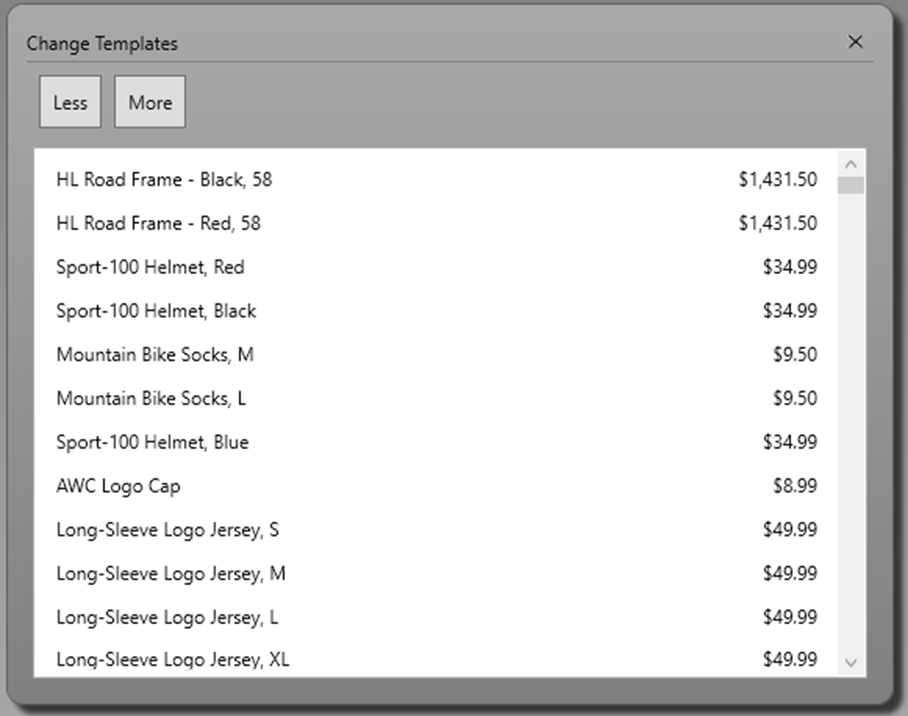
Change Templates Dynamically
In the last blog post you created a <DataTemplate> element in App.xaml with a Key value set to ProductLargeTemplate. Create a new <DataTemplate> element on the user control with your list box and set the Key value to ProductSmallTemplate. Make this element look like the following.
<DataTemplate x:Key="ProductSmallTemplate">
  <Grid>
    <Grid.ColumnDefinitions>
      <ColumnDefinition Width="*" />
      <ColumnDefinition Width="Auto" />
    </Grid.ColumnDefinitions>
    <TextBlock Grid.Column="0"
                Text="{Binding Path=Name}" />
    <TextBlock Grid.Column="1"
                TextAlignment="Right"
                Text="{Binding Path=ListPrice, StringFormat=c}" />
  </Grid>
</DataTemplate>
This template, when applied to a list box, looks like Figure 2. The goal is to write a little code to switch between the large and small templates at runtime. Add a StackPanel on your form and place two buttons within that panel. One button modifies the ItemTemplate of the list box to display the small template. The other button modifies the ItemTemplate to display the large template.
<StackPanel Grid.Row="1"
            Orientation="Horizontal">
  <Button Content="Less"
          Click="LessButton_Click" />
  <Button Content="More"
          Click="MoreButton_Click" />
</StackPanel>
Set the Name property on the ListBox to ProductList as shown in the following code. Set the ItemTemplate to use the ProductSmallTemplate.
<ListBox Grid.Row="2"
     Name="ProductList"
     ItemTemplate="{StaticResource ProductSmallTemplate}"
     ItemsSource="{Binding Source={StaticResource viewModel},
                           Path=Products}" />
Write the event procedures for the two buttons you added within the StackPanel. The LessButton_Click event procedure modifies the ItemTemplate property of the list box by locating the data template you named ProductSmallTemplate. The MoreButton_Click event procedure modifies the ItemTemplate property of the list box by locating the data template you named ProductLargeTemplate in the App.xaml file.
private void LessButton_Click(object sender, RoutedEventArgs e)
{
  ProductList.ItemTemplate = (DataTemplate)this.FindResource("ProductSmallTemplate");
}

private void MoreButton_Click(object sender, RoutedEventArgs e)
{
  ProductList.ItemTemplate = (DataTemplate)App.Current.FindResource("ProductLargeTemplate");
}
If you have not already done so, remove the XAML to display the list box horizontally. Run the WPF application and click on each button to see the view of each row in the list box change from one template to another.
Multi-Binding Converter
Sometimes you may not have the source code to your data source and thus you can't add new properties to display. Or, you need a way of performing a calculation and have the resulting value displayed. In either case, you need a class that can multiple pieces of data from the original data source, perform some transformation or calculation on that data, then return a value to display. This type of a class is called a multi-binding converter. This converter class returns the profit margin as a formatted string that can be used to display on the UI.
In the Product class there are two properties StandardCost and ListPrice, but there is no property for ProfitMargin. The class ProfitMarginAsStringConverter is shown in the listing below. This class calculates the profit margin and returns it as a string formatted as a percentage.
public class ProfitMarginAsStringConverter : IMultiValueConverter
{
  public object Convert(object[] values, Type targetType,
    object parameter, CultureInfo culture) {
    decimal ret = 0;
    decimal cost = 0;
    decimal price = 0;

    if (values.Count() > 1) {
      // First parameter is cost
      cost = System.Convert.ToDecimal(values[0]);
      // Second parameter is price
      price = System.Convert.ToDecimal(values[1]);
      // Calculate the profit margin
      ret = Math.Round(((price - cost) / cost), 1);
    }

    return ret.ToString("P");
  }

  public object[] ConvertBack(object value, Type[] targetTypes,
    object parameter, CultureInfo culture) {
    throw new NotImplementedException();
  }
}
The difference between a multi-binding converter and a normal converter class is this class implements the IMultiValueConverter interface. The Convert() method accepts an array of object values instead of just a single value that a normal converter class accepts.
Within the code, you read the values[] array to get the values passed in. These values are passed positionally, so you need some good documentation on the usage of this class. This class reads the cost first, then the list price. With these two pieces of information you can determine the profit margin for a product. The calculated profit margin is converted into a percentage format using the ToString("P") method and returned from the Convert() method.
To use this class, create an instance of this class in XAML by adding the following definition in your <UserControl.Resources> element.
<UserControl.Resources>
  <local:ProfitMarginAsStringConverter
    x:Key="profitMarginConverter" />
</UserControl.Resources>
Once this resource is created, add a new row definition to your <Grid>. Add a StackPanel element and put it into that new row, in this case, row 6. Write the following code within the StackPanel to display the text returned from the convert class you just wrote.
<StackPanel Grid.Row="6"
            Grid.Column="0"
            Margin="0"
            Orientation="Horizontal">
  <TextBlock Text="Profit Margin: "
              FontWeight="Bold" />
  <TextBlock TextAlignment="Right"
              FontWeight="Bold">
    <TextBlock.Text>
      <MultiBinding
        Converter="{StaticResource profitMarginConverter}">
        <Binding Path="StandardCost" />
        <Binding Path="ListPrice" />
      </MultiBinding>
    </TextBlock.Text>
  </TextBlock>
</StackPanel>
In the above code, you create a <TextBlock> element but you don't set the Text property to a binding. Instead, you create the Text property as an element; <TextBlock.Text>. It is within this element you build your <MultiBinding> element to pass the StandardCost and Price properties to your ProfitMarginAsStringConverter class. The value returned is placed into the Text property, which is displayed on your UI.
Summary
In this blog post you modified a list box to display its rows horizontally instead of vertically. You wrote some C# code to dynamically change the template at runtime via input from the user. Finally, you wrote a multi-binding converter classes to take multiple pieces of data and convert those into values that can be used to display on the rows in the list box.