WPF has several controls that allow you to display a list of data to the user. In this blog post you are going to learn the basics of displaying product data in a Combo Box, a List Box and a Data Grid. In the next post you are going to learn to customize the look of the basic controls using templates. To use these list controls, you are going to create an Entity Framework entity class and a DbContext class to retrieve data from the AdventureWorksLT sample database that comes with SQL Server. You are going to create a view model class to interface with the WPF list controls.
Create a WPF Application
Create a new WPF application in Visual Studio and give it a name of WPF.ListControls. Right mouse-click on the project and select Manage NuGet Packages… from the context-sensitive menu. Locate the EntityFramework package by Microsoft and add it to your project. Open the MainWindow.xaml file and modify the title attribute to the following.
Title="List Control Samples"
Remove the Height and Width attributes and add a WindowStartUpLocation attribute.
WindowStartupLocation="CenterScreen"
Add a Menu System
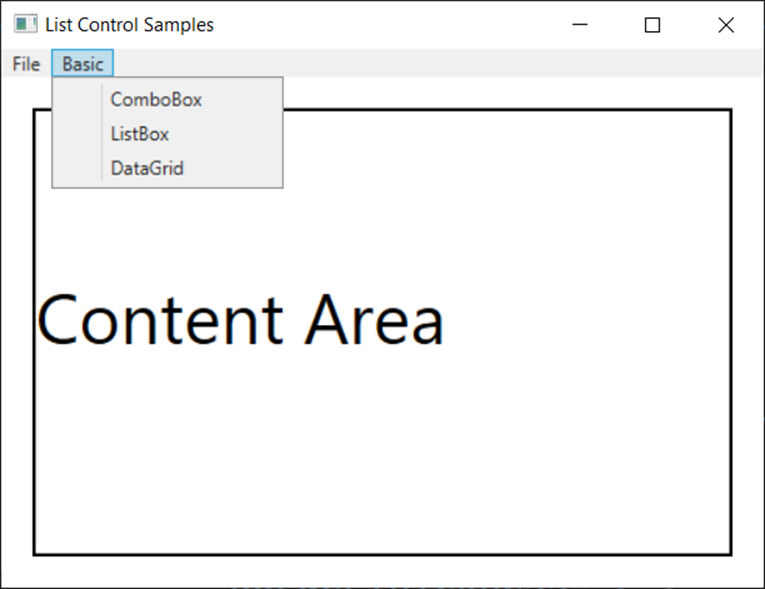
Within the <Grid> control on the MainWindow add two row definitions. The first row contains the menu system used to select which user control to display. The second row contains a Grid control in which to display each sample user control as shown in Figure 1.
Let's build the menu system within the <Grid> on the MainWindow. Enter the code below.
<Grid>
  <Grid.RowDefinitions>
    <RowDefinition Height="Auto" />
    <RowDefinition Height="*" />
  </Grid.RowDefinitions>

  <!-- Menu Area -->
  <Menu Grid.Row="0"
        IsMainMenu="True">
    <MenuItem Header="_File">
      <MenuItem Header="E_xit"
                Click="Exit_Click" />
    </MenuItem>
    <MenuItem Header="Basic">
      <MenuItem Header="ComboBox"
                Click="MenuItem_Click"
        Tag="WPF.ListControls.ListControlsBasic.ComboBoxBasic" />
      <MenuItem Header="ListBox"
                Click="MenuItem_Click"
        Tag="WPF.ListControls. ListControlsBasic.ListBoxBasic" />
      <MenuItem Header="DataGrid"
                Click="MenuItem_Click"
        Tag="WPF.ListControls. ListControlsBasic.DataGridSimple" />
    </MenuItem>
  </Menu>
</Grid>
The Tag property in each menu item represents the full namespace and control name that you wish to display. You are going to learn how to create these controls in just a little bit.
Add Content Area
Add a Grid control after the menu system. This Grid control is where you are going to load the sample user controls. Set the Name property of this control to "contentArea". Setting the Name property allows you to reference this control in your code behind.
<!-- Content Area -->
<Grid Grid.Row="1"
      Margin="20"
      VerticalAlignment="Top"
      Name="contentArea" />
Write Code to Display User Controls
To display a user control within the Grid named "contentArea", you first need to create an instance of the control, then add it to the Children collection of the Grid. For example:
contentArea.Children.Add(
   new WPF.ListControls.ListControlsBasic.ComboBoxBasic());
The control you are creating a new instance of is the same name as what is in the Tag property of the first menu item. When you are in C#, the compiler can resolve this reference to the actual user control you have created. However, the menu system simple has a string value of this user control. You are going to need to use reflection to create an instance of the user control represented by the string.
Open the MainWindow.xaml.cs file and write a method named LoadUserControl(). This method accepts a string that is the full namespace and control name that you wish to create an instance of. Call the GetType() method on the Type class to get an instance of a Type for the control name in the string. If a non-null value is returned, create an instance of this type by calling the CreateInstance() method on the Activator class. If the class is created successfully, add this new instance of the user control using the Add() method of the Children property of the Grid named "contentArea".
private void LoadUserControl(string controlName)
{
  Type ucType = null;
  UserControl uc = null;

  // Create a Type from controlName parameter
  ucType = Type.GetType(controlName);
  if (ucType == null) {
    MessageBox.Show("The Control: " + controlName
                      + " does not exist.");
  }
  else {
    // Close current user control in content area
    contentArea.Children.Clear();

    // Create an instance of this control
    uc = (UserControl)Activator.CreateInstance(ucType);
    if (uc != null) {
      // Display control in content area
      contentArea.Children.Add(uc);
    }
  }
}
Menu Click Events
Next, add the MenuItem_Click() event and the Exit_Click() event procedures as shown in the following code.
private void MenuItem_Click(object sender, RoutedEventArgs e)
{
  // Display a user control
  LoadUserControl(((MenuItem)sender).Tag.ToString());
}

private void Exit_Click(object sender, RoutedEventArgs e)
{
  this.Close();
}
Data Layer
For our samples, display a list of products from the AdventureWorksLT sample database that comes with SQL Server. This database contains a SalesLT.Product table which comes with a couple of hundred products. Let's use the Entity Framework to access this product table and build a collection of Product objects. You are going to create a Product class and a DbContext class to retrieve the product data.
Product Class
Right mouse-click on the project and add a new folder named EntityClasses. Right mouse-click on this folder and add a new class named Product. At the top of this new file, make sure you have the following two using statements.
using System;
using System.ComponentModel.DataAnnotations.Schema;
Add the code shown below in this new class file.
[Table("Product", Schema = "SalesLT")]
public partial class Product
{
  public int? ProductID { get; set; }
  public string Name { get; set; }
  public string ProductNumber { get; set; }
  public string Color { get; set; }
  public decimal? StandardCost { get; set; }
  public decimal? ListPrice { get; set; }
  public string Size { get; set; }
  public decimal? Weight { get; set; }
  public int? ProductCategoryID { get; set; }
  public int? ProductModelID { get; set; }
  public DateTime? SellStartDate { get; set; }
  public DateTime? SellEndDate { get; set; }
  public DateTime? DiscontinuedDate { get; set; }
  public byte[] ThumbNailPhoto { get; set; }
  public string ThumbnailPhotoFileName { get; set; }
  public Guid? rowguid { get; set; }
  public DateTime? ModifiedDate { get; set; }
}
The above class contains one property for each field in the Product table.
AdventureWorksLTDbContext Class
Right mouse-click on the project and add a new folder named Models. Right mouse-click on this new folder and add a new class named AdventureWorksLTDbContext. At the top of this file add the following using statements.
using System.Data.Entity;
using WPF.ListControls.EntityClasses;
Modify the rest of this class to look like the code shown below.
public partial class AdventureWorksLTDbContext : DbContext
{
  public AdventureWorksLTDbContext() : base("name=AdventureWorksLT")
  {
  }

  public virtual DbSet<Product> Products { get; set; }
}
This class is responsible for all data access to the Product table in the AdventureWorksLT database.
Modify App.config File
You need to add a <connectionStrings> element in the App.config file in order to setup the connection string the Entity Framework will use to access the appropriate database.
<connectionStrings>
  <add name="AdventureWorksLT"
       connectionString="Server=Localhost;
                         Database=AdventureWorksLT;
                         Trusted_Connection=Yes;"
       providerName="System.Data.SqlClient" />
</connectionStrings>
View Model Class
When using WPF for development you should be using the MVVM design pattern. Right mouse-click on the project and add a new folder named ViewModels. Right mouse-click on this new folder and add a new class named ProductViewModel. This class contains a single property named Products and a method named LoadProducts() to populate this property.
using System;
using System.Collections.ObjectModel;
using WPF.ListControls.EntityClasses;
using WPF.ListControls.Models;

namespace WPF.ListControls.ViewModels
{
  public class ProductViewMode
  {
    public ProductViewModel()
    {
      LoadProducts();
    }

    public ObservableCollection<Product> Products { get; set; }

    public virtual ObservableCollection<Product> LoadProducts()
    {
      try {
        using (AdventureWorksLTDbContext db =
                 new AdventureWorksLTDbContext()) {
          Products = new ObservableCollection<Product>(db.Products);
        }
      }
      catch (Exception ex) {
        System.Diagnostics.Debug.WriteLine(ex.ToString());
      }

      return Products;
    }
  }
}
Basic Combo Box
Right mouse-click on the project and add a new folder named ListControlsBasic.
Simple ComboBox
Right mouse-click on the ListControlsBasic folder and add a new user control named ComboBoxBasic. Add a new XML namespace in the <UserControl> definition.
<UserControl
   x:Class="WPF.ListControls.ListControlsBasic.ComboBoxBasic"
   xmlns="http://schemas.microsoft.com/..."
   xmlns:x="http://schemas.microsoft.com/winfx/2006/xaml"
   xmlns:mc="http://schemas.openxmlformats.org/..."
   xmlns:d="http://schemas.microsoft.com/..."
   xmlns:vm="clr-namespace:WPF.ListControls.ViewModels"
Just below the <UserControl> definition, add a UserControl.Resources section in which you create a new instance of the ProductViewModel class you created earlier.
<UserControl.Resources>
 <vm:ProductViewModel x:Key="viewModel" />
</UserControl.Resources>
Within the <Grid> control add a ComboBox control. Set the ItemsSource property to a binding that references the source as the viewModel you created in the UserControl.Resources section of this user control. The Path of the data is the Products collection you created in the ProductViewModel class. Set the DisplayMemberPath to the Name property in the Product class. Each time it renders a new item for the ComboBox the product name is pulled from the Product object and displayed within the ComboBox.
<ComboBox
   ItemsSource="{Binding Source={StaticResource viewModel},
                         Path=Products}"
   DisplayMemberPath="Name" />
Try it Out
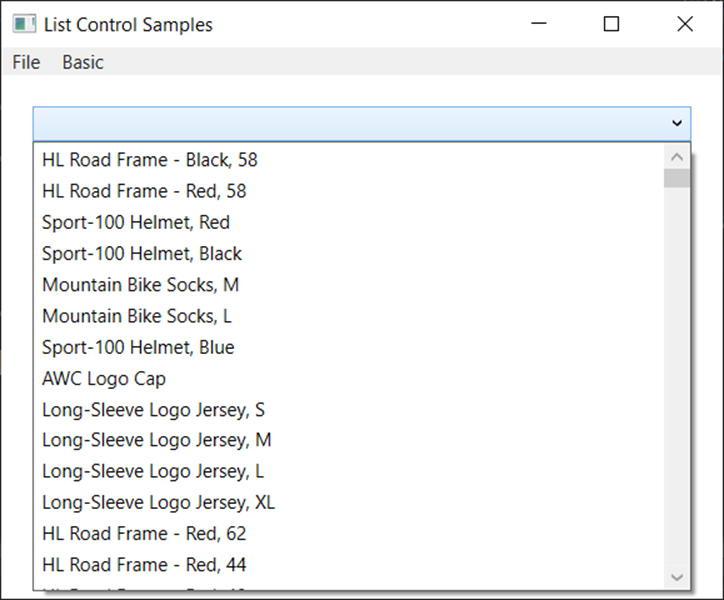
Run the application and click on the Basic menu, then click on the ComboBox menu. You should see a list of products within the ComboBox on the main window as shown in Figure 2.
Basic List Box
Displaying data in a ListBox is identical to displaying data in a ComboBox. Right mouse-click on the ListControlsBasic folder and add a new user control named ListBoxBasic. Add a new XML namespace to the <UserControl> definition.
<UserControl
   x:Class="WPF.ListControls.ListControlsBasic.ListBoxBasic"
   xmlns="http://schemas.microsoft.com/..."
   xmlns:x="http://schemas.microsoft.com/winfx/2006/xaml"
   xmlns:mc="http://schemas.openxmlformats.org/..."
   xmlns:d="http://schemas.microsoft.com/..."
   xmlns:vm="clr-namespace:WPF.ListControls.ViewModels"
xmlns:vm="clr-namespace:WPF.ListControls.ViewModels"
Just below the <UserControl> definition, add a UserControl.Resources section in which you create a new instance of the ProductViewModel class you created earlier.
<UserControl.Resources>
 <vm:ProductViewModel x:Key="viewModel" />
</UserControl.Resources>
Within the <Grid> control add a ListBox control. Set the ItemsSource property to a binding that references the source as the viewModel you created in the UserControl.Resources section of this user control. The Path of the data is the Products collection you created in the ProductViewModel class. Set the DisplayMemberPath to the Name property in the Product class. Each time it renders a new item for the ListBox the product name is pulled from the Product object and displayed within the ListBox.
<ListBox Grid.Row="1"
   ItemsSource="{Binding Source={StaticResource viewModel}, Path=Products}"
   DisplayMemberPath="Name" />
Try it Out
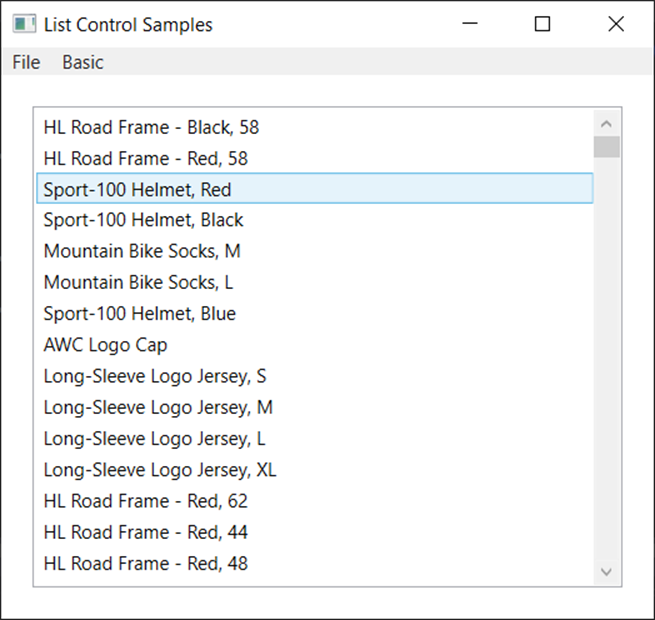
Run the application and click on the Simple menu, then click on the ListBox menu. You should see a list of products within the ListBox on the main window as shown in Figure 3.
Basic Data Grid
Right mouse-click on the ListControlsBasic folder and add a new user control named DataGridBasic. Add a new XML namespace in the <UserControl> definition.
<UserControl
   x:Class="WPF.ListControls.ListControlsBasic.DataGridBasic"
   xmlns="http://schemas.microsoft.com/..."
   xmlns:x="http://schemas.microsoft.com/winfx/2006/xaml"
   xmlns:mc="http://schemas.openxmlformats.org/..."
   xmlns:d="http://schemas.microsoft.com/..."
   xmlns:vm="clr-namespace:WPF.ListControls.ViewModels"
Just below the <UserControl> definition, add a UserControl.Resources section in which you create a new instance of the ProductViewModel class you created earlier.
<UserControl.Resources>
 <vm:ProductViewModel x:Key="viewModel" />
</UserControl.Resources>
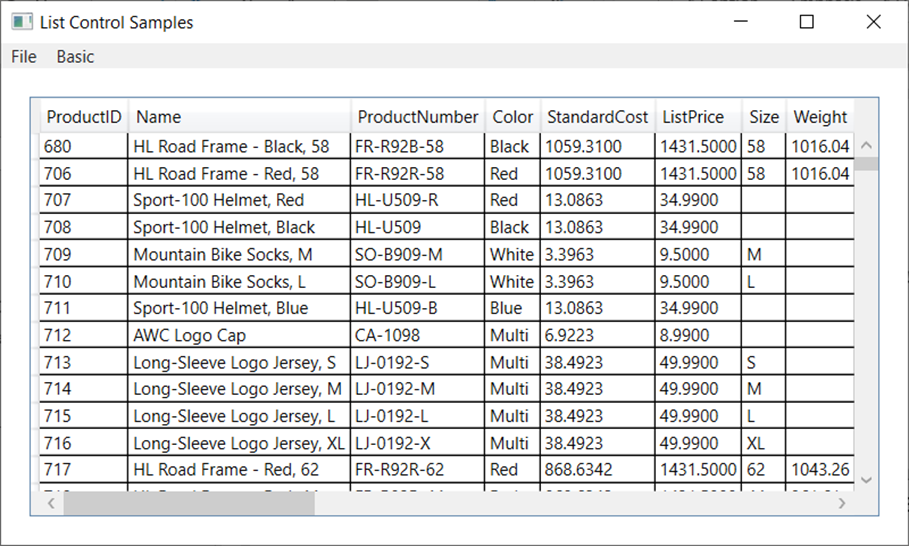
Within the <Grid> control add a DataGrid control. Set the ItemsSource property to a binding that references the source as the viewModel you created in the UserControl.Resources section of this user control. The Path of the data is the Products collection you created in the ProductViewModel class. A DataGrid will display a singled column for each property in the Product class as shown in Figure 4.
<DataGrid ItemsSource="{Binding Source={StaticResource viewModel},
                                Path=Products}" />
Try it Out
Run the application and click on the Simple menu, then click on the DataGrid menu. You should see a list of products within the DataGrid displayed on the main window as shown in Figure 4.
Summary
In this blog post you learned to use a ComboBox, a ListBox and a DataGrid. You created an entity class to represent each row in the Products table in the AdventureWorksLT database. You created a DbContext class to allow you to retrieve data from the Products table. You also created a view model class to bind to the different list controls on their respective user controls. There is a lot more you can do with each of these list controls. You will learn more about customizing the look of each of these controls in the next blog post.
#wpf #pauldsheriff #development #programming