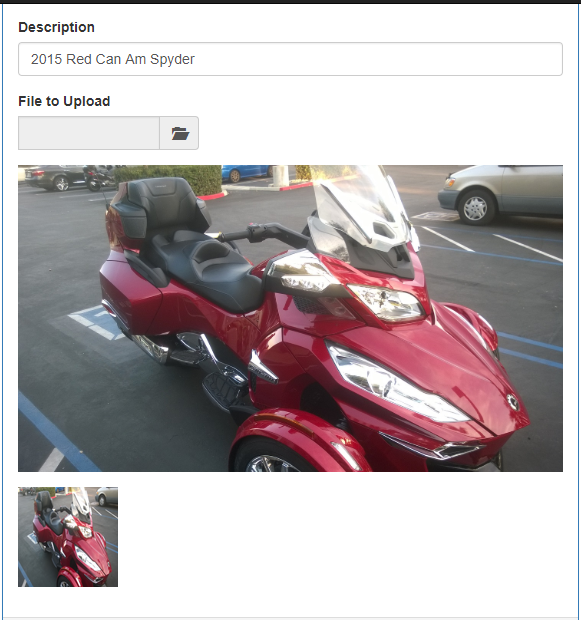
In the last two blog posts in this series you learned to style the file upload control and to use a view model to simplify data binding. In this third blog post, you build a class that allows you to take a large image and create a thumbnail image from it (See Figure 1).
When displaying a list of files, you may wish to show a small graphic, so the user can see what the file looks like. Instead of sending down a large image and squishing it by setting the height and width attributes, you should use a small graphic as this makes the amount of data sent to the browser less. To have a small graphic, either the user needs to create one, or you do. A thumbnail can be created using classes from the System.Drawing, System.Drawing.Drawing2D and System.Drawing.Imaging namespaces.
Web Configuration Settings
To create a thumbnail from a large image you need to decide on what size you want to make the thumbnail. Instead of hard-coding the width and height, place these settings into the Web.config file instead. Not all files you upload can have a thumbnail made from them. For example, a text file can't be displayed as a thumbnail. In cases like these, you should have a default thumbnail image you can present to the user. Add another key named noPreviewFileName into the appSettings section of your Web.config file to specify the path and file name for this default image. To help determine if a thumbnail can be created from the uploaded file, create a comma-delimited list of types to compare against the file type of the uploaded file. Name this key imageTypes in the appSettings section. If the upload file type matches one of the entries in this list, then create a thumbnail. If not, then use the default thumbnail. Below are the entries you should add to the appSettings section in your Web.config file.
<appSettings>
  <!-- BEGIN: Settings needed for image upload -->
  <add key="thumbWidth" value="100" />
  <add key="thumbHeight" value="100" />
  <add key="imageTypes" value="bmp,gif,img,jpeg,jpg,png" />
  <add key="noPreviewFileName" value="~/Images/NoPreview.png" />
  <!-- END: Settings needed for image upload -->
</appSettings>
Application Settings Class
Create a class named AppSettings with several static properties to hold the data that is read from the appSettings section in the Web.Config file. Below is the complete source code for this class.
using System;
using System.Configuration;

namespace FileUploadSamples.Components
{
  public class AppSettings
  {
    public static string NoPreviewFileName { get; set; }
    public static string ImageTypes { get; set; }
    public static int ThumbWidth { get; set; }
    public static int ThumbHeight { get; set; }

    protected static T GetValue<T>(string keyName, T defaultValue)
    {
      string value;
      T ret;

      value = ConfigurationManager.AppSettings[keyName];
      if (string.IsNullOrEmpty(value)) {
        ret = defaultValue;
      }
      else {
        ret = (T)Convert.ChangeType(value, typeof(T));
      }

      return ret;
    }

    public static void LoadDefaults()
    {
      NoPreviewFileName = GetValue<string>("noPreviewFileName",
                           "~/Images/NoPreview.png");
      ImageTypes = GetValue<string>("imageTypes",
                            "bmp,gif,img,jpeg,jpg,png");
      ThumbWidth = GetValue<int>("thumbWidth", 100);
      ThumbHeight = GetValue<int>("thumbHeight", 100);
    }
  }
}
The first thing you add are public properties to hold each of the keys within the appSettings section. Each property has the same name as the keys in the appSettings section.
Next, create a method to read an individual key/value pair from the configuration file. To this method you pass the key name to read and a default value if that key is not found. This method is created as a generic method, so you can convert the string value in the configuration file to the required data type.
The next method, LoadDefaults(), reads all of the values in the appSettings section. Set each public property in this class by calling the GetValue<T>() method specifying the data type, the key name, and the default value to return if the key is not found in the appSettings section.
Call from Global.asax
The global values from the Web.config file only need to read in and set one time. Add the code shown in bold below to the Application_Start() method in the Global.asax file.
protected void Application_Start()
{
  AreaRegistration.RegisterAllAreas();
  FilterConfig.RegisterGlobalFilters(GlobalFilters.Filters);
  RouteConfig.RegisterRoutes(RouteTable.Routes);
  BundleConfig.RegisterBundles(BundleTable.Bundles);

  AppSettings.LoadDefaults();

  // Set full path for 'No Preview' image
  AppSettings.NoPreviewFileName =
    Server.MapPath(AppSettings.NoPreviewFileName);
  }
Call the LoadDefaults() method to load all values from the Web.config file. After loading the values the NoPreviewFileName property is set to a value such as "~/Images/NoPreview.png". This needs to be converted into a real path that corresponds to the \Images folder on the server. The C# File.ReadAllBytes() method is going to be called to read in this file so it can be converted to a Base64 encoded string. The ReadAllBytes() method can't use relative paths, so you need a real path. Use Server.MapPath() to get the path for the web site directory.
Image to Thumbnail Class
The next class, named ImageThumbnailConverter, is used to take a full-size image and create a thumbnail from it. This class uses the AppSettings class for the size of thumbnail to create and to check if the file can be converted to a thumbnail. If the file can not be converted, then the default image set the in NoPreviewFileName is returned. Below is the complete source code for this class.
using System.Drawing;
using System.Drawing.Drawing2D;
using System.Drawing.Imaging;
using System.IO;
using System.Linq;

namespace FileUploadSamples.Components
{
  public class ImageThumbnailConverter
  {
    protected bool CanConvertToThumbnail(string type)
    {
      bool ret = false;

      // Get the file type
      if (type.Contains("/")) {
        type = type.Substring(type.LastIndexOf("/") + 1);
      }

      // See if the image type is in the list of valid types
      if (AppSettings.ImageTypes.Split(',').Contains(type)) {
        ret = true;
      }

      return ret;
    }

    public byte[] ConvertToThumbnail(byte[] image, string contentType)
    {
      byte[] ret = null;

      if (CanConvertToThumbnail(contentType)) {
        // Resize image
        ret = Resize(image, AppSettings.ThumbWidth, AppSettings.ThumbHeight);
      }
      else {
        // Return 'No Preview' file
        ret = File.ReadAllBytes(AppSettings.NoPreviewFileName);
      }

      return ret;
    }

    protected byte[] Resize(byte[] fullImage, int width, int height)
    {
      Image image = null;
      ImageConverter converter = new ImageConverter();
      Rectangle rect = new Rectangle(0, 0, width, height);
      Bitmap ret = new Bitmap(width, height);

      // Convert bytes to Image data type
      using (MemoryStream ms = new MemoryStream((byte[])fullImage)) {
        image = Image.FromStream(ms);
      }

      // Maintain DPI regardless of physical size
      ret.SetResolution(image.HorizontalResolution, image.VerticalResolution);

      // Create a new Graphics object from the Image
      using (Graphics newGraphic = Graphics.FromImage(ret)) {
        // Set high quality mode (may not be needed depending on image)
        newGraphic.CompositingMode = CompositingMode.SourceCopy;
        newGraphic.CompositingQuality = CompositingQuality.HighQuality;
        newGraphic.InterpolationMode = InterpolationMode.HighQualityBicubic;
        newGraphic.SmoothingMode = SmoothingMode.HighQuality;
        newGraphic.PixelOffsetMode = PixelOffsetMode.HighQuality;

        using (ImageAttributes imgAttr = new ImageAttributes()) {
          // Help prevent ghosting around the image
          imgAttr.SetWrapMode(WrapMode.TileFlipXY);
          // Render the new Image
          newGraphic.DrawImage(image, rect, 0, 0, image.Width, image.Height, GraphicsUnit.Pixel, imgAttr);
        }
      }

      // Convert new image to byte array and return it
      return (byte[])converter.ConvertTo(ret, typeof(byte[]));
    }
  }
}
The first method, CanConvertToThumbnail(), checks the file type to see if it matches one of the ones contained in the ImageTypes property in the AppSettings class. A true or false value is returned from this method.
The next method, ConvertToThumbnail(), first calls the CanConvertToThumbnail() method. If the file passed in can not be converted, then the file set in the AppSettings.NoPreviewFileName property is read in and that is what is returned from this method. If it is a valid file type that can be converted, then a method named Resize() is called to create the thumbnail.
The Resize() method is responsible for creating the thumbnail. A new Bitmap object is created in the variable 'ret'. The width and height of the thumbnail is set when creating this new bitmap. An Image object is created from the byte array passed in, then the resolution of that image is set into the bitmap object. A Graphics object is created from the bitmap. It is this Graphics object that is used to draw the original image into the bitmap object at the specified size. Several properties are set on the Graphics object to help with maintaining a high quality image. Finally the DrawImage() method on the Graphics object is called to take the original image and convert it into a 100x100 thumbnail. The new image is converted to an array of bytes and returned from this Resize() method.
Modify View Model Class to Create a Thumbnail
Now that you have a class to create the thumbnail, add a new method to call the ConvertToThumbnail() method on the ImageThumbnailConverter class. The code for this method is shown below.
public void CreateThumbnail()
{
  ImageThumbnailConverter conv = new ImageThumbnailConverter();

  // Create thumbnail
  FileUploadInfo.Thumbnail = conv.ConvertToThumbnail(FileUploadInfo.Contents, FileUploadInfo.ContentType);
}
A new instance of the ImageThumbnailConverter class is created. The ConvertToThumbnail() method is called, passing in the original image (the Contents property), and the type of file (the ContentType property). This method returns a byte array of the thumbnail for the image, or a byte array of the default image that says, "No Preview". This return value is placed into the Thumbnail property of the FileUpload object.
Add an <img> Tag to Display the Thumbnail
Now that you have a thumbnail image to display, add a new form-group on your .cshtml page to display this thumbnail. Add a <img> tag to your page and set the src attribute to the ThumbnailAsString property.
<div class="form-group">
  <img id="theImage"
        src="@Model.FileUploadInfo.ThumbnailAsString"
        title="@Model.FileUploadInfo.FileName" />
</div>
Modify the Post Method
In the Post method on your controller, call the CreateThumbnail() method on the view model class. After the thumbnail is created, pass the view model object to the View() method and the thumbnail image is displayed on the page.
[HttpPost]
public ActionResult Sample01(Thumbnail01ViewModel vm)
{
  // Set file info properties from file upload control
  vm.SetFileInfoProperties();

  // Create thumbnail
  vm.CreateThumbnail();

  // Look at properties of View Model
  System.Diagnostics.Debugger.Break();

  // TODO: Do something with the file data

  return View(vm);
}
Summary
Instead of always returning a large image back to the page to be displayed, you might consider using a thumbnail image. This helps you keep the amount of data traveling back and forth across the internet to a minimum. In this blog post you added some default values to the Web.config file and created a class to read those values. These values are used in the new ImageThumbnailConverter class to build a new thumbnail from an original image file.
#mvc #fileupload #pauldsheriff #development #programming