In the last blog post you learned to style the file upload control and to upload a file. You gathered information about the file and placed that information into individual variables in a controller class. In this blog post you create a view model class with properties to hold the file information, and a method to extract the file information, and upload the file.
Use a View Model to Gather Additional Data
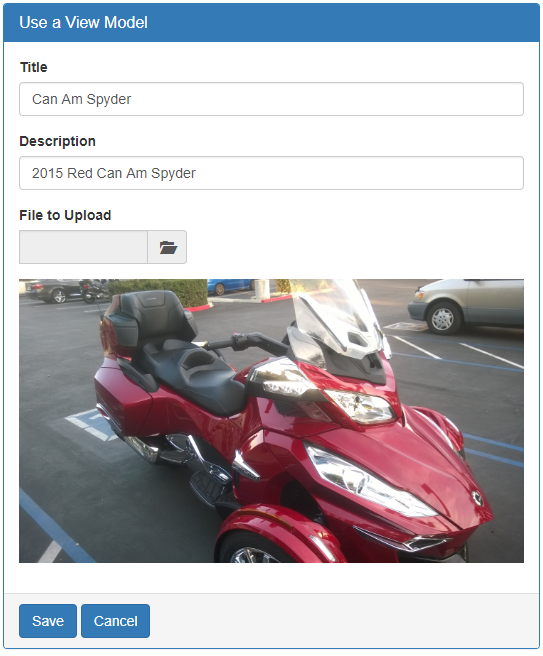
Prior to uploading the file, you might want to ask the user to fill in additional information about the file such as a short title and a description as shown in Figure 1. Create a view model class with properties for both the title and the description so you can use MVC data binding. The contents of the file are going to be Base64 encoded so they can be displayed back on the page after the post-back.
Using Base64 encoding makes the size of the image much larger, so you don't want to do this for large files, but for smaller files, this works well. A benefit of using Base64 encoding is you do not need to store the file on your web server just to display it on the page. If you store a file on the web server, you must worry about how to clean up these files after you are done with them.
View Model Class
Instead of using individual variables within a controller to gather file information, create properties in a view model instead. The code below is an example of what your view model class might look like.
public class VMSample01ViewModel
{
  public string FileTitle { get; set; }
  public string FileDescription { get; set; }
  public string FilePath { get; set; }
  public string FileName { get; set; }
  public int ContentLength { get; set; }
  public string ContentType { get; set; }
  public byte[] Contents { get; set; }
  public object ContentsAsString
  {
    get {
      if (Contents != null) {
        return "data:" + ContentType + ";base64," + Convert.ToBase64String(Contents);
      }
      else {
        return null;
      }
    }
    set { var tmp = value; }
  }
  public HttpPostedFileBase FileToUpload { get; set; }


  public void SetFileInfoProperties()
  {
    if (FileToUpload != null && FileToUpload.ContentLength > 0) {
      // Get the uploaded file
      using (MemoryStream ms = new MemoryStream()) {
        FileToUpload.InputStream.CopyTo(ms);
        Contents = ms.ToArray();
      }

      // Fill in other file information
      ContentLength = FileToUpload.ContentLength;
      ContentType = FileToUpload.ContentType;
      FilePath = Path.GetDirectoryName(FileToUpload.FileName);
      FileName = Path.GetFileName(FileToUpload.FileName);
    }
  }
}
You have properties for the data you gather about the file such as the name, length and type. You also have the actual contents of the file expressed as a byte array. One additional property is called ContentsAsString. This property returns the byte array as a Base64 encoded string. This is what is going to used by the <img> tag you are going to add to your .cshtml page.
The HTML
To be able to use data-binding to a view model you need to add a @model directive at the top of your .cshtml page with the name of the view model you are using. In this sample you are using the VMSample01ViewModel class presented above.
@model FileUploadSamples.ViewModels.VMSample01ViewModel

@{
  ViewBag.Title = "View Model Sample 1";
}

@using (@Html.BeginForm(null, null, FormMethod.Post, new { enctype = "multipart/form-data" })) {
  <div class="row">
    <div class="col-xs-12">
      <div class="panel panel-primary">
        <div class="panel-heading">
          <h1 class="panel-title">Use a View Model</h1>
        </div>
        <div class="panel-body">
          <div class="form-group">
            @Html.LabelFor(m => m.FileTitle, "Title")
            @Html.TextBoxFor(m => m.FileTitle, new { @class = "form-control" })
          </div>
          <div class="form-group">
            @Html.LabelFor(m => m.FileDescription, "Description")
            @Html.TextBoxFor(m => m.FileDescription, new { @class = "form-control" })
          </div>
          <div class="form-group">
            @Html.LabelFor(m => m.FileToUpload, "File to Upload")
            <div class="input-group col-xs-4">
              @Html.TextBoxFor(m => m.FileToUpload, new { type = "file", style = "display:none;" })
              <input id="fileDisplay" type="text" class="form-control" readonly="readonly" onfocus="fileUploadClick();" />
              <span class="input-group-addon" onclick="fileUploadClick();">
                <span class="glyphicon glyphicon-folder-open"></span>
              </span>
            </div>
          </div>
          <div class="form-group">
            <img id="theImage"
                 style="width: 100%;"
                 src="@Model.ContentsAsString"
                 title="@Model.FileName" />
          </div>
        </div>
        <div class="panel-footer">
          <button type="submit" id="btnSave" class="btn btn-primary">Save</button>
          <a href='@Url.Action("Index", "Home")' class="btn btn-primary">Cancel</a>
        </div>
      </div>
    </div>
  </div>
}

@section Scripts {
  <script>
    $(document).on('change', ':file', function (e) {
      $("#fileDisplay").val(e.target.value);
    });

    function fileUploadClick() {
      $("#FileToUpload").trigger("click");
    }
  </script>
}
Each label and text box on the .cshtml file is now created using LabelFor and TextBoxFor. Using these new @Html methods binds the input the user enters to the properties within the view model class.
@Html.LabelFor(m => m.FileTitle, "Title")
@Html.TextBoxFor(m => m.FileTitle, new { @class = "form-control" })
A new form-group is added after the other input fields. Within this form-group is an <img> element used to display the uploaded image. The src attribute of this image is set to the property ContentsAsString. This is the property that returns the image as a Base64 encoded string.
<img id="theImage" style="width: 100%;"
     src="@Model.ContentsAsString"
     title="@Model.FileName" />
Since you are now data binding to the FileToUpload property in the view model, you need to modify the fileUploadClick() function to use a upper-case 'F' instead of a lower-case 'f'. When you use the TextBoxFor method, the id and name attributes created in the HTML are the names of the properties they are bound to. Thus, you need to use an upper-case 'F'.
function fileUploadClick() {
  $("#FileToUpload").trigger("click");
}
The Controller for the View Model Sample
Modify the controller to create an instance of the VMSample01ViewModel class and pass that object to the View() method. This object is what is passed to the @model directive in your page. The @Html helper method binds to the appropriate properties in this object.
public ActionResult Sample01()
{
  VMSample01ViewModel vm = new VMSample01ViewModel();

  return View(vm);
}
Change the POST method to accept the VMSample01ViewModel object when the form is submitted back to the server. Call the SetFileInfoProperties() method on the view model to upload the file and to set the other file information properties within the view model class as shown in the code below.
[HttpPost]
public ActionResult Sample01(VMSample01ViewModel vm)
{
  // Set file info properties from file upload control
  vm.SetFileInfoProperties();

  // Look at properties of View Model
  System.Diagnostics.Debugger.Break();

  // TODO: Do something with the file data

  return View(vm);
}
After you have uploaded the file, and set all the file information properties, pass the view model class back to the View() method so the ContentsAsString property can be displayed within the <img> tag.
Create FileUpload Class
Later in this blog series you are going to store the file information uploaded into an SQL Server table. To prepare for that, create a class named FileUpload and add the appropriate Entity Framework attributes to each property so this class can be mapped to a table.
[Table("FileUpload")]
public partial class FileUpload
{
  [Key]
  public int FileUploadId { get; set; }

  [Required]
  [StringLength(100)]
  public string FileTitle { get; set; }

  [StringLength(500)]
  public string FileDescription { get; set; }

  [StringLength(500)]
  public string FilePath { get; set; }

  [StringLength(100)]
  public string FileName { get; set; }

  public int? ContentLength { get; set; }

  [StringLength(100)]
  public string ContentType { get; set; }

  public byte[] Contents { get; set; }

  public object ContentsAsString
  {
    get {
      if (Contents != null) {
        return "data:" + ContentType + ";base64," + Convert.ToBase64String(Contents);
      }
      else {
        return null;
      }
    }
    set { var tmp = value; }
  }

  [StringLength(255)]
  public string ServerUrl { get; set; }

  [StringLength(255)]
  public string ServerThumbnailUrl { get; set; }

  public byte[] Thumbnail { get; set; }

  public object ThumbnailAsString
  {
    get {
      if (Thumbnail != null) {
        return "data:" + ContentType + ";base64," + Convert.ToBase64String(Thumbnail);
      }
      else {
        return null;
      }
    }
    set { var tmp = value; }
  }
}
The properties in the FileUpload class are the same as the ones you just created in the view model class. Some data annotation attributes are added to the class and some of the properties to match up with the SQL Server table you are going to create later. In addition, some new properties are added so you can save the file onto the server, and you can create a thumbnail of an image file uploaded. You are going to learn to perform these actions later in this blog post series.
Modify the View Model
Now that you have created the FileUpload class, you can remove all the individual properties from the view model class and create one property of the type FileUpload. Be sure to add a constructor to the view model to create an instance of the FileUpload class and place that instance into the FileUploadInfo property. Change the SetFileInfoProperties() method to set the file information properties in the instance of the FileUpload class.
public class VMSample02ViewModel
{
  public VMSample02ViewModel()
  {
    FileUploadInfo = new FileUpload();
  }

  public FileUpload FileUploadInfo { get; set; }

  public HttpPostedFileBase FileToUpload { get; set; }

  public void SetFileInfoProperties()
  {
    if (FileToUpload != null && FileToUpload.ContentLength > 0) {
      // Get the uploaded file
      using (MemoryStream ms = new MemoryStream()) {
        FileToUpload.InputStream.CopyTo(ms);
        FileUploadInfo.Contents = ms.ToArray();
      }

      // Fill in other file information
      FileUploadInfo.ContentLength = FileToUpload.ContentLength;
      FileUploadInfo.ContentType = FileToUpload.ContentType;
      FileUploadInfo.FilePath = Path.GetDirectoryName(FileToUpload.FileName);
      FileUploadInfo.FileName = Path.GetFileName(FileToUpload.FileName);
    }
  }
}
Bind to the Properties of the FileUploadInfo property
Now that you removed all the individual properties from the view model class, you now need to change the bindings on your .cshtml page. Open the page and add the FileUploadInfo property before the FileTitle, FileDescription and ContentsAsString properties bound on the page.
<div class="panel-body">
  <div class="form-group">
    @Html.LabelFor(m => m.FileUploadInfo.FileTitle, "Title")
    @Html.TextBoxFor(m => m.FileUploadInfo.FileTitle, new { @class = "form-control" })
  </div>
  <div class="form-group">
    @Html.LabelFor(m => m.FileUploadInfo.FileDescription, "Description")
    @Html.TextBoxFor(m => m.FileUploadInfo.FileDescription, new { @class = "form-control" })
  </div>
  <div class="form-group">
    @Html.LabelFor(m => m.FileToUpload, "File to Upload")
    <div class="input-group col-xs-4">
      @Html.TextBoxFor(m => m.FileToUpload, new { type = "file", style = "display:none;" })
      <input id="fileDisplay" type="text" class="form-control" readonly="readonly" onfocus="fileUploadClick();" />
      <span class="input-group-addon" onclick="fileUploadClick();">
        <span class="glyphicon glyphicon-folder-open"></span>
      </span>
    </div>
  </div>
  <div class="form-group">
    <img id="theImage"
          style="width: 100%;"
          src="@Model.FileUploadInfo.ContentsAsString"
          title="@Model.FileUploadInfo.FileName" />
  </div>
</div>
Run the page and make sure everything is still working as it should.
Summary
Instead of adding a lot of code in your MVC controller, you should create a view model class instead. Using a view model allows you to take advantage of data binding and keeps the code in your controller to a minimum. This leads to more reusable and testable code. If you are going to eventually store data into a SQL Server, create a class to bind to that table, then you can use that class within your view model so you do not have duplicate properties.