Asynchronous JavaScript And XML (Ajax) is the cornerstone of communication between your client-side and server-side code. Regardless of whether you use JavaScript, jQuery, Angular, React or any other client-side language, they all use Ajax under the hood to send and receive data from a web server. Using Ajax you can read data from, or send data to, a web server all without reloading the current web page. In other words, you can manipulate the DOM and the data for the web page without having to perform a post-back to the web server that hosts the web page. Ajax gives you a huge speed benefit because there is less data going back and forth across the internet. Once you learn how to interact with Ajax, you will find the concepts apply to whatever front-end language you use.
In this article you use JavaScript and the XMLHttpRequest object to communicate from a client web page to a .NET Core Web API server. You are going to build a set of functions necessary to read and modify product data contained in a SQL Server table. Each of these functions use JavaScript, XMLHttpRequest and callback functions to accomplish these goals.
Download Starting Projects
Instead of creating a front-end web server and a .NET Core Web API server in this article I have two sample projects you may download to get started quickly. If you are unfamiliar with building a front-end web server and a .NET Core Web API server, you can build them from scratch step-by-step in my three blog posts listed below.
- Create CRUD Web API in .NET Core
- Create .NET Core MVC Application for Ajax Communication
- Create Node Web Server for Ajax Communication
You can find all three of these blog posts at https://www.pdsa.com/blog. Instructions for getting the samples that you can start with are contained in each blog post. You are going to need blog post #1, then choose the appropriate web server you wish to use for serving web pages; either .NET MVC (#2) or NodeJS (#3).
Start Both Projects
After you have reviewed the blog posts and downloaded the appropriate sample projects to your hard drive, start both projects running. The first project to load is the Web API project. Open the WebAPI folder in VS Code and click on the Run | Start Debugging menus to load and run the .NET Web API project.
Open the AjaxSample folder in VS Code.
If you are using node, open the AjaxSample folder in VS Code, open a Terminal window and type npm install. Then type npm run dev to start the web server running and to have it display the index.html page in your browser.
If you are using the .NET MVC application, open the AjaxSample-NET folder in VS Code and click on the Run | Start Debugging menus to load and run the .NET MVC project. The index.cshtml page should now be displayed in your browser window.
Try it Out
Go to your browser for the front-end web server (localhost:3000) and you should see a page that looks like Figure 1. If your browser looks like this, everything is working for your front-end web server.
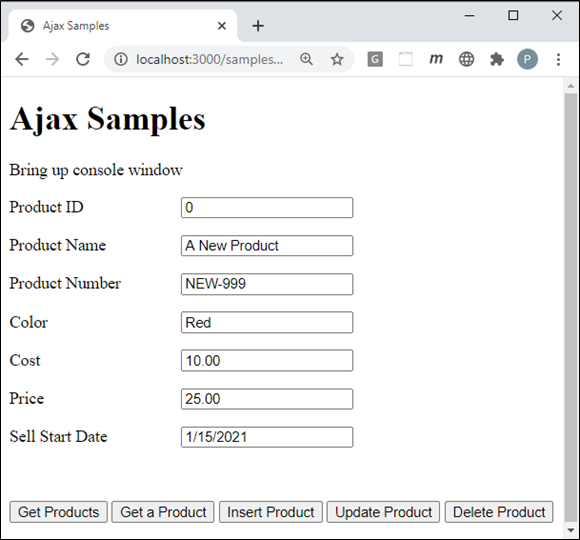
Open the Browser Tools in your browser, usually accomplished by clicking the F12 key. Click the Get Products button and you should see the product data retrieved from the Product table in the AdventureWorksLT database and displayed in your console window.
Get a Single Product
Besides retrieving all products, you might also need to just retrieve a single product. This requires you to send a unique product id to the Get(int id) method in the Web API ProductController class. Go back to the index page in your web server and add the code shown in Listing 1 into the getProduct() function.
The only difference between this function and the get() function is you add a forward-slash and the value from the productID input element.
function getProduct() {
  let req = new XMLHttpRequest();

  req.onreadystatechange = function () {
    if (this.readyState === XMLHttpRequest.DONE &&
      this.status === 200) {
        displayMessage("Product Retrieved");
        console.log(this.response);
        setInput(JSON.parse(this.response));
    }
  };

  req.open("GET", URL + "/" + getValue("productID"));

  req.send();
}
Try it Out
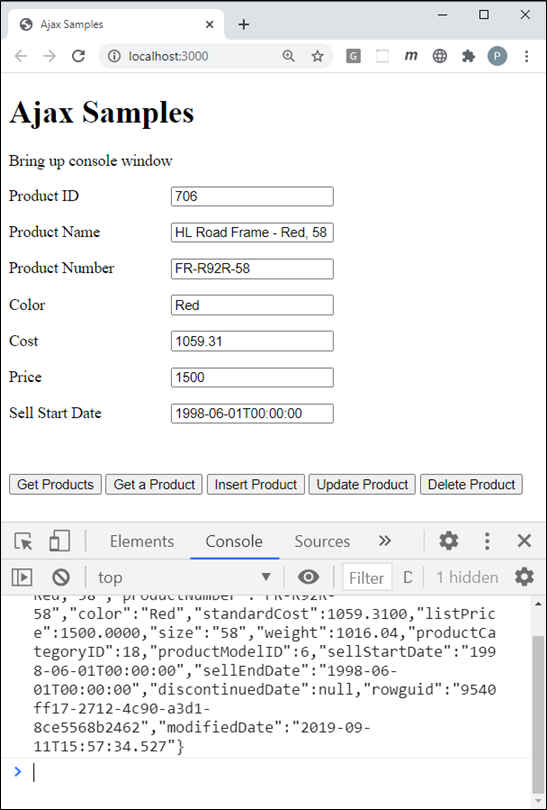
Save the changes on your index.html page and go to the browser. Fill in the value 706 into the input field, then click the Get a Product button to see some data in the console window like Figure 2. If for some reason you do not get data, look into the SalesLT.Product table in SQL Server and find a valid ProductID value you can use.
Insert a Product
To call the Post() method in the Web API server from the index page, add the code shown in Listing 2 to the insertProduct() function. The first line in this function calls the getFromInput() function to build the product object to be submitted to the Post() Web API method. The rest of the Ajax code is similar to what you wrote before with just a couple of differences.
The first difference is the call to the open() method on the XMLHttpRequest object. You pass in the verb "POST" as the first parameter. This maps to the Post() method in the Web API because of the attribute [HttpPost()] added immediately above that method.
The second difference is you add a header to the request object to set the content-type header to "application/json". This informs the Web API that a JSON object is being passed in. The third difference is when you call the send() method you stringify the product JSON object.
The last difference in this function is in the onreadystatechange event. You need to check for a status code of 201 as this is what you are sending back from the Post() method in the Web API. When you get the response property use the JSON.parse() method to convert the response into a JSON object and put that object into the product variable. You can now use this variable to access any of the data that was passed back from the Post() method.
function insertProduct() {
  // Get product data from input fields
  let product = getFromInput();

  // Create XMLHttpRequest object
  let req = new XMLHttpRequest();

  // Hook up the onreadystatechange event
  req.onreadystatechange = function () {
    if (this.readyState === XMLHttpRequest.DONE &&
      this.status === 201) {
      // Get product object
      product = JSON.parse(this.response);

      displayMessage("Product Inserted");
      console.log(product);

      // Display product info
      setInput(product);
    }
  };

  // Open the request object
  req.open("POST", URL);

  // Add Content-Type header
  req.setRequestHeader("Content-Type",
                       "application/json");

  // Send the request to the server
  req.send(JSON.stringify(product));
}
Try it Out
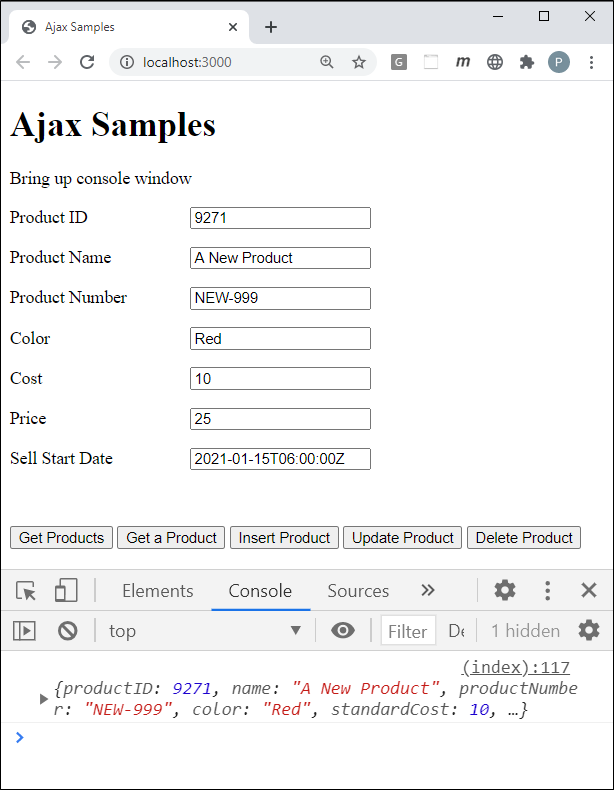
Save all changes to all files in the HTML project and go to your browser. You should see a page that looks like Figure 3. Make sure the Product ID field is equal to a zero (0) value. Go ahead and click on the Insert Product button and if everything works correctly you should see a value appear in the Product ID field. This lets you know that the product object was successfully inserted into the table.
NOTE: Don't hit the Insert Product button again as that will cause an error. If you want to try inserting another product, change the Product ID to a zero (0), the Product Name and Product Number fields to something unique.
Error Handling
The code you created previously does not respond to errors and you always should put some error handling in your code. In the ajax-common.js file is a function called handleAjaxError(). This function should be called if an error occurs when making a Web API call. Modify the insertProduct() function to add some error handling. Locate the insertProduct() function and add the code shown in bold in Listing 3 to this function.
function insertProduct() {
  let product = getFromInput();

  // Create XMLHttpRequest object
  let req = new XMLHttpRequest();

  // When the entire request fails it
  // is probably a network error
  req.onerror = function () {
    handleAjaxError(new Error(
      'There was a network error.'));
  };

  // Hook up the onreadystatechange event
  req.onreadystatechange = function () {
    if (this.readyState === XMLHttpRequest.DONE &&
      this.status === 201) {
      // Get product object
      product = JSON.parse(this.response);

      displayMessage("Product Inserted");
      console.log(product);

      // Display product info
      setInput(product);
    } else if (this.readyState === XMLHttpRequest.DONE &&
      this.status >= 400) {
      // Check for error
      handleAjaxError({
        "status": this.status,
        "statusText": this.statusText,
        "response": this.response,
        "responseText": this.responseText
      });
    }
  };

  // Open the request object
  req.open("POST", URL);

  // Add Content-Type header
  req.setRequestHeader("Content-Type", "application/json");

  // Send the request to the server
  req.send(JSON.stringify(product));
}
Try it Out
Save all your changes in your HTML project and go to the browser. The original Product data that you just inserted should be filled into the input fields. If you try to insert this data again, you get a 500 error from your Web API Post() method. The handleAjaxError() now reports all of the exception data returned from the Web API project.
Update Product Data
If you wish to update a product that already exists in the AdventureWorksLT Product table, you need to call the Put() method in your Web API project. Add the code to the updateProduct() function, Listing 4, in the index page. The changes from the insertProduct() function are displayed in a bold font.
function updateProduct() {
  let product = getFromInput();

  // Create XMLHttpRequest object
  let req = new XMLHttpRequest();

  // When the entire request fails it is probably a network error
  req.onerror = function () {
    handleAjaxError(new Error('There was a network error.'));
  };

  // Hook up the onreadystatechange event
  req.onreadystatechange = function () {
    if (this.readyState === XMLHttpRequest.DONE &&
      this.status === 200) {
      // Get Updated Product Data
      product = JSON.parse(this.response);

      displayMessage("Product Updated");
      console.log(product);

      setInput(product);
    } else if (this.readyState === XMLHttpRequest.DONE &&
      this.status >= 400) {
      // Check for error
      handleAjaxError({
        "status": this.status,
        "statusText": this.statusText,
        "response": this.response,
        "responseText": this.responseText
      });
    }
  };

  // Open the request object
  req.open("PUT", URL + "/" + product.productID);

  // Add Content-Type header
  req.setRequestHeader("Content-Type", "application/json");

  // Send the request to the server
  req.send(JSON.stringify(product));
}
Try it Out
Save all your changes in your HTML project. Go to the browser and enter a valid Product ID into the input field. Modify the Color or the List Price values and then click on the Update Product button to see if all the changes you entered work correctly.
Delete Product Data
Now that you have inserted and updated product data, let's learn to delete a product from the table. Add the code shown in Listing 5 to the deleteProduct() function on the index page. In this function, call the getFromInput() function to build the product object. Make sure you fill in the Product ID you want to delete prior to clicking on the Delete Product button.
function deleteProduct() {
  let product = getFromInput();

  // Create XMLHttpRequest object
  let req = new XMLHttpRequest();

  // When the entire request fails it is probably a network error
  req.onerror = function () {
    handleAjaxError(new Error('There was a network error.'));
  };

  // Hook up the onreadystatechange event
  req.onreadystatechange = function () {
    if (this.readyState === XMLHttpRequest.DONE &&
      this.status === 200) {
      displayMessage("Product Deleted");
      console.log(this.response);
      clearInput();
    } else if (this.readyState === XMLHttpRequest.DONE &&
      this.status >= 400) {
      // Check for error
      handleAjaxError({
        "status": this.status,
        "statusText": this.statusText,
        "response": this.response,
        "responseText": this.responseText
      });
    }
  };

  // Open the request object
  req.open("DELETE", URL + "/" + product.productID);

  // Send the request to the server
  req.send(JSON.stringify(product));
}
Try it Out
Save all your changes in your HTML project. Go to the browser and enter a valid Product ID into the input field. Click on the Delete Product button. You should see a value of true reported back in the console window.
Simplify the XMLHttpRequest Code
If you look at the Ajax code in your index.html page you should notice that each function is almost identical to one another. If you see similar code, you should always try to make it generic. This Ajax code can be made generic by creating a function named ajax() in the ajax-common.js file. Open the ajax-common.js file and add the function shown in Listing 6. This function accepts five arguments that are described in Table 1.
| Argument | Description |
|---|---|
|
verb |
An HTTP verb such as GET, POST, PUT, DELETE, etc. |
|
url |
The URL where the resource you wish to call is located. |
|
data |
The data to send to the API call. This argument is optional. |
|
resolve |
A callback which is called to indicate the Ajax call was successful. This argument is optional. |
|
reject |
A callback which is called to indicate the Ajax call was not successful. This argument is optional. |
function ajax(verb, url, data, resolve, reject) {
  // Create XMLHttpRequest object
  let req = new XMLHttpRequest();

  // When the entire request fails it is probably a network error
  req.onerror = function () {
    if(reject) {
      reject(new Error('There was a network error.'));
    }
  };

  // Setup state change event
  req.onreadystatechange = function () {
    if (this.readyState === XMLHttpRequest.DONE) {
      // Check status property to see what is going on
      if (this.status >= 200 && this.status < 400) {
        if (resolve) {
          resolve(JSON.parse(this.response));
        }
      } else if (this.status >= 400) {
        if(reject) {
          reject({
            "status": this.status,
            "statusText": this.statusText,
            "response": this.response,
            "responseText": this.responseText
          });
        }
      }
    }
  };

  // Open Request
  req.open(verb, url);

  // Set headers for JSON
  req.setRequestHeader("Content-Type", "application/json");

  // Check to see if we need to pass data
  if (data) {
    // Submit the request with data
    req.send(JSON.stringify(data));
  }
  else {
    // Submit the request
    req.send();
  }
}
Get All Products
If you now use the ajax() function you can simplify all your Ajax calls. Open the index page and locate the get() function and modify it to look like the following:
function get() {
  ajax("GET", URL, null,
    function (data) {
      console.log(data);
      displayMessage("Products Retrieved");
    },
    function (error) {
      handleAjaxError(error);
    });
}
Get A Single Product
Modify the getProduct() function to use the ajax() function.
function getProduct() {
  ajax("GET", URL + "/" + getValue("productID"), null,
    function (data) {
      displayMessage("Product Retrieved");
      console.log(data);
      setInput(data);
    },
    function (error) {
      handleAjaxError(error);
    });
}
Insert a Product
Modify the insertProduct() function to use the ajax() function.
function insertProduct() {
  let product = getFromInput();

  ajax("POST", URL, product,
    function (data) {
      displayMessage("Product Inserted");
      console.log(data);
      setInput(data);
    },
    function (error) {
      handleAjaxError(error);
    });
}
Update a Product
Modify the updateProduct() function to use the new ajax() function.
function updateProduct() {
  let product = getFromInput();

  ajax("PUT", URL + "/" + product.productID, product,
    function (data) {
      displayMessage("Product Updated");
      console.log(data);
      setInput(data);
    },
    function (error) {
      handleAjaxError(error);
    });
}
Delete a Product
Modify the deleteProduct() function to use the ajax() function.
function deleteProduct() {
  let product = getFromInput();

  ajax("DELETE", URL + "/" + product.productID, null,
    function (data) {
      displayMessage("Product Deleted");
      console.log(data);
      clearInput();
    },
    function (error) {
      handleAjaxError(error);
    });
}
Try it Out
Save all changes you made in the HTML project and go to the browser and click on each of the buttons to ensure everything works as expected. Remember you must change the Product ID to 0, and the Product Name and Number to something you have not entered before you can hit the Insert Product button.
Summary
In this article you learned to use the XMLHttpRequest object that is built-in to all browsers for communicating from a web page to a web server. This object is the key component of Ajax communication regardless of what client-side programming language you use. Creating your own wrapper around the XMLHttpRequest object can greatly cut down your JavaScript coding. However, there are many wrappers around this object already built such as the $.ajax() method in jQuery and the Fetch API. Over the next several articles, you are going to learn how to use the various Ajax API's using jQuery, JavaScript, Promises, and the Fetch API.
#jquery #xmlhttprequest #javascript #webapi #dotnet #pauldsheriff #development #programming