In this blog post you learn to create an MVC application to serve up web pages. On these web pages you can use JavaScript or jQuery to make Ajax calls to a web server that hosts Web API calls.
Asynchronous JavaScript And XML (Ajax) is the cornerstone of communication between your client-side and server-side code. Regardless of whether you use JavaScript, jQuery, Angular, React or any other client-side language, they all use Ajax under the hood to send and receive data from a web server. Using Ajax you can read data from, or send data to, a web server all without reloading the current web page. In other words, you can manipulate the DOM and the data for the web page without having to perform a post-back to the web server that hosts the web page. Ajax gives you a huge speed benefit because there is less data going back and forth across the internet. Once you learn how to interact with Ajax, you will find the concepts apply to whatever front-end language you use.
Ajax Defined
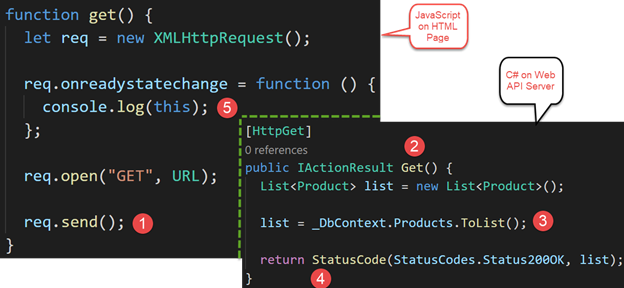
Though Ajax stands for Asynchronous JavaScript And XML, the data transmitted can be JSON, XML, HTML, JavaScript, plain text, etc. Regardless of the type of data, Ajax can send and receive it. Ajax uses a built-in object of all modern browsers called XMLHttpRequest. This object is used to exchange data back and forth between your web page and a web server as shown in Figure 1.
Looking at Figure 1 you see an HTML page sends a request for data (1) to a controller in the web server (2). The controller gets that data from data storage medium (3) and from the data model serializes that data as JSON (4) and sends the response back to the HTML page (5). If you now look at Figure 2, you can see both the JavaScript and C# code on the client and the server that corresponds to each of the numbers on Figure 1. Don't worry too much about the code in Figure 2, you are going to learn how to build it in this blog post.

Methods of Communication
While the XMLHttpRequest object is the basis for all Ajax calls, there are actually a few different ways you can utilize this object. Table 1 provides a list of the most common methods in use today.
| Technology | Description |
|---|---|
|
JavaScript XMLHttpRequest using Callbacks |
This is the most primitive method of Ajax communication. |
|
JavaScript XMLHttpRequest with Promises |
You can build your own wrapper around the callbacks and return a Promise. |
|
Fetch API |
Most modern browsers support this Promise-based API for Ajax communication. |
|
jQuery using Callbacks |
Prior to jQuery 1.5, you used callbacks to respond to Ajax events returned by the underlying XMLHttpRequest object. |
|
jQuery using Promises |
From jQuery 1.5 onwards the jQuery team put a Promise-based wrapper around the XMLHttpRequest object so you can use a more streamlined approach to Ajax queries. |
|
jQuery Ajax Shorthand Functions |
There are several shorthand functions such as $.get(), $.post() that allow you to shorten the syntax for making GET and POST requests of the Web API server. |
If you are unfamiliar with the terms callbacks and promises, the two sections that follow provide you with a definition and some links on the web to learn more about each.
Callbacks
A callback is the object reference (the name) of a function that is passed to another function. That function can then determine if, and when, to invoke (callback) that function. It may call that function after some variable changes state, or maybe after some task is perform. For a nice definition and an example of a callback, check out this blog post: https://www.freecodecamp.org/news/javascript-callback-functions-what-are-callbacks-in-js-and-how-to-use-them.
Promises
A promise is the result of the completion of an asynchronous operation. The operation may succeed, fail, or be cancelled. Whatever the result, the promise allows us access to the result and any data returned by the operation. For more information see this post: https://developer.mozilla.org/en-US/docs/Web/JavaScript/Reference/Global_Objects/Promise. Another great blog post compares callbacks and promises: https://itnext.io/javascript-promises-vs-rxjs-observables-de5309583ca2.
Tools You Need
It is recommended you follow along step-by-step with this blog post to build a .NET MVC application to serve up HTML and run your JavaScript and jQuery. For this blog post I am going to use the following technologies.
- Visual Studio Code v1.8x.x or higher
- .NET v6.x or higher
- JavaScript ECMAScript 2015 or higher
If you wish to follow along, download these tools, and install on your computer. At the time of the writing of this blog post, these tools can be retrieved from the following locations.
- VS Code - code.visualstudio.com
- .NET Core - dotnet.microsoft.com/download
The Web API Application
To communicate with a Web API server, you need to get the sample code from my previous blog post entitled "Create CRUD Web API in .NET Core" which you can find at https://www.pdsa.com/blog.
Create a .NET MVC Application
To make calls using Ajax from a web page to a Web API server, you need to run the HTML pages from their own web server. There are several web servers you can use, I am going to use .NET MVC. Create this project by opening VS Code and selecting Terminal | New Terminal… from the menu. Click into the terminal window and navigate to a folder where you normally create your development projects. On my machine I am going to use the \Samples folder on my D drive. Run the following commands one at a time in the terminal (substituting your project folder for the first command).
CD D:\Samples
dotnet new mvc -n AjaxSample
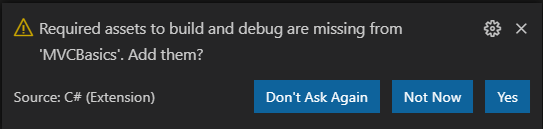
Load the AjaxSample folder in VS Code and wait a few seconds until you see a prompt at the bottom right of your screen asking to add some assets to the project as shown in Figure 3. Answer "Yes" to the prompt to add Required Assets.
Open the \Views\Home\Index.cshtml file and make the file look like the code shown in Listing 1. You are going to add more HTML to this file later, but this small set of HTML provides us with a good starting point.
@{
    ViewData["Title"] = "Ajax Samples";
}

<h1>Ajax Samples</h1>
<p>Bring up console window</p>

<button type="button" onclick="get();">Get Products</button>

@section Scripts {
    <script>
      'use strict';

      const URL = "/resources/products.json";
      //const URL = "http://localhost:5000/api/product";

      function get() {

      }
    </script>
}
Add a Resources Folder
To start illustrating how to use Ajax, you are going to read data from a .json file stored in the web server. Create a folder under the AjaxSample\wwwroot folder named \resources. Add a new file named products.json. Add the data shown in Listing 2 into this new file.
[
  {
    "productID": 680,
    "name": "HL Road Frame - Black, 58",
    "productNumber": "FR-R92B-58",
    "color": "Black",
    "standardCost": 1059.31,
    "listPrice": 1431.50
  },
  {
    "productID": 707,
    "name": "Sport-100 Helmet, Red",
    "productNumber": "HL-U509-R",
    "color": "Red",
    "standardCost": 13.08,
    "listPrice": 34.99
  },
  {
    "productID": 709,
    "name": "Mountain Bike Socks, M",
    "productNumber": "SO-B909-M",
    "color": "White",
    "standardCost": 3.3963,
    "listPrice": 9.50
  },
  {
    "productID": 709,
    "name": "Mountain Bike Socks, M",
    "productNumber": "SO-B909-M",
    "color": "White",
    "standardCost": 3.3963,
    "listPrice": 9.50
  },
  {
    "productID": 712,
    "name": "AWC Logo Cap",
    "productNumber": "CA-1098",
    "color": "Multi",
    "standardCost": 6.9223,
    "listPrice": 8.99
  },
  {
    "productID": 821,
    "name": "Touring Front Wheel",
    "productNumber": "FW-T905",
    "color": "Black",
    "standardCost": 96.7964,
    "listPrice": 218.01
  }
]
Change the Port Number
Open the launchSettings.json file located under the \Properties folder and modify the applicationUrl property under the "AjaxSample" property as shown in bold below. Since you are going to be using a Web API server that is running on a different port, and thus a different domain, Cross-Origin Resource Sharing (CORS) needs to have a specific URL that we can whitelist. Change the URL to use port number 3000. Later when you create your Web API server, you are going to use this domain address with CORS to allow calls to travel from one domain to another.
"AjaxSample": {
  "commandName": "Project",
  "dotnetRunMessages": "true",
  "launchBrowser": true,
  "applicationUrl": "http://localhost:3000",
  "environmentVariables": {
  "ASPNETCORE_ENVIRONMENT": "Development"
}
Try it Out
Run this MVC application and you should see a screen that looks like Figure 4.
Using XMLHttpRequest
As mentioned earlier in this blog post, the most fundamental building block of Ajax is the XMLHttpRequest object. Let's now use this object to retrieve the products in the \resources\projects.json file in your web server. Open the index.cshtml file and modify the empty get() function to look like the following code.
function get() {
  let req = new XMLHttpRequest();

  req.onreadystatechange = function () {
    console.log(this);
  };

  req.open("GET", URL);

  req.send();
}
The code above creates an instance of the XMLHttpRequest object that is built-in to your browser. It assigns a function to the onreadystatechange event that fires as the XMLHttpRequest object performs various operations and reports on the different states in the readyState property. The next line of code opens the XMLHttpRequest object and tells it the type of request it is performing and the URL on which to send the type of request. In this case you are performing a GET on the URL pointing to the /resources/products.json file. The final line of code; req.send(), sends an asynchronous request to the web server to retrieve the products.json file.
Try it Out
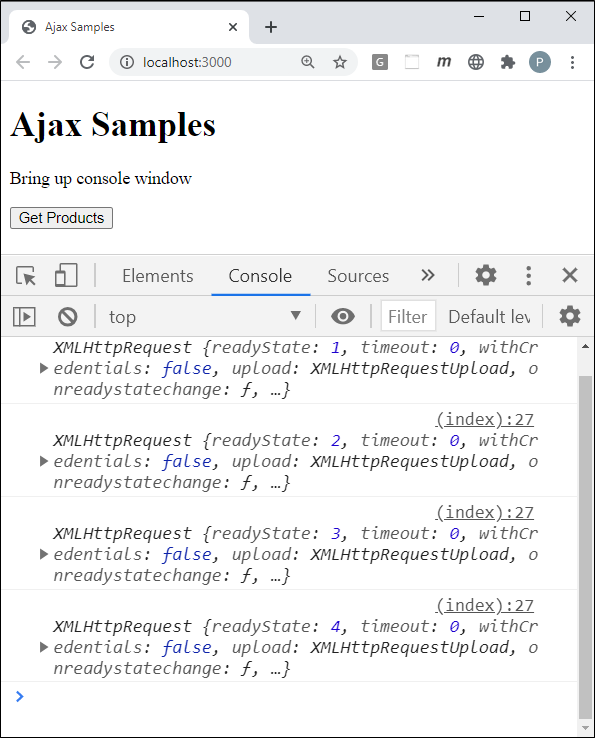
Save the index.cshtml file and restart the debugger. Open the Developer Tools console window in your browser (typically the F12 key). Click on the Get Products button and you should see something that like Figure 4. Depending on the browser you use, the console window may look slightly different.
The XMLHttpRequest readyState Property
As you can see from the developer tools console window you received four different states. As the XMLHttpRequest goes through retrieving the data, it sends some notifications that you are reporting in the function you assigned to the onreadystatechange event. An instance of the XMLHttpRequest object is assigned to 'this' within the onreadystatechange event. The readyState property on the object can have one of five different values.
0 = Unsent
1 = Opened
2 = Headers Received
3 = Loading
4 = Done
Once the readyState property is equal to the value 4, the call is complete. If the call is successful the data returned from the Ajax call is available in the this.response property. The response property returns an array of product objects that looks like the data shown in Listing 2. If you want to just retrieve the array of product objects, and not each state, modify the get() function to look like the following:
function get() {
  let req = new XMLHttpRequest();

  req.onreadystatechange = function () {
if (this.readyState === XMLHttpRequest.DONE &&
        this.status === 200) {
      console.log(this.response);
    }
  };

  req.open("GET", URL);

  req.send();
}
In the above code you check the value of the readyState property to see if it is equal to the constant DONE. You should also check the status property to see if the call was successful. A successful call should set the status property to a value between 200 and 399. A value of 400 and higher signifies an error occurred with the Ajax call.
Add a displayResponse Function
Instead of writing a bunch of console.log() statements within the onreadystatechange event function, create a function named displayResponse(). In this function you can then write any calls you want such as those shown below.
function displayResponse(resp) {
  console.log(resp);
  console.log("");
  console.log("responseText: " + resp.responseText);
  console.log("status: " + resp.status.toString());
  console.log("statusTest: " + resp.statusText);
}
Modify the get() function to call the displayResponse() function when the status is equal to 200.
function get() {
  let req = new XMLHttpRequest();
  req.onreadystatechange = function () {
    if (this.readyState === XMLHttpRequest.DONE &&
        this.status === 200) {
displayResponse(this);
    }
  };
  req.open("GET", URL);
  req.send();
}
Try it Out
Save all the changes within VS Code, restart the debugger, then go back to your browser and click on the Get Products button again. In the console window you should see the product data, plus the additional status property values.
Get Product Data from JavaScript
Leave the Web API project running and go back to the index.cshtml page in your web server and modify the constant URL to look like the following.
const URL = "http://localhost:5000/api/product";
Save the changes to the index.cshtml page, restart the debugger, and go to the browser. Click the Get Products button and in the console window you should now see product data retrieved from the Product table in the AdventureWorksLT database.
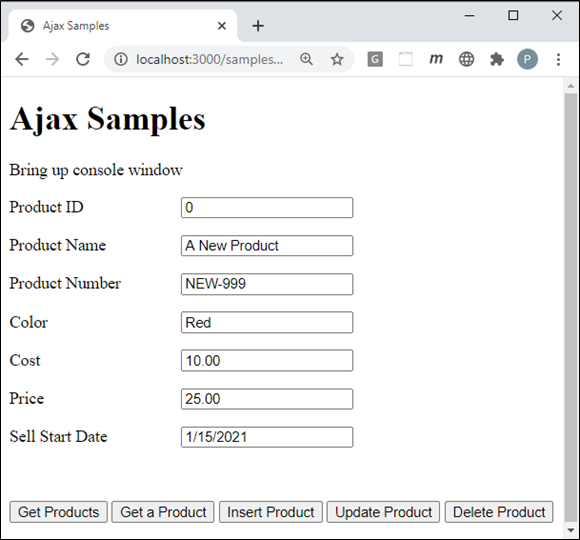
Add Web Form to Submit Product Data
Let's now finish up the index.cshtml page to allow you to enter Product data using a form. Look a Figure 5 to see what this page is going to look like.
Add Some Global Styles
The MVC application already has the bootstrap CSS framework, so many styles are already there for us to use. However, go to the \wwwroot\css folder and open the site.css file and add just a couple of styles as shown in Listing 3 to the site.css file.
form .row label {
  display: inline-block !important;
  min-width: 10em !important;
}

.infoMessage {
  font-weight: bold;
}

.errorMessage {
  font-weight: bold;
  background-color: red;
  color: white;
}
Add a Product Form
In the index.cshtml file delete the button within the <body> but leave the <h1> and the <p> tags.
<button type="button" onclick="get();">Get Products</button>
Add the code shown in Listing 4 just below the <h1> and the <p> tag to your index page.
<form>
  <div class="row">
    <label for="productID">Product ID</label>
    <input id="productID" name="productID"
           type="text" value="0" />
  </div>
  <div class="row">
    <label for="name">Product Name</label>
    <input id="name" name="name" type="text"
           value="A New Product" />
  </div>
  <div class="row">
    <label for="productNumber">Product Number</label>
    <input id="productNumber" name="productNumber"
           type="text" value="NEW-999" />
  </div>
  <div class="row">
    <label for="color">Color</label>
    <input id="color" name="color" type="text"
           value="Red" />
  </div>
  <div class="row">
    <label for="standardCost">Cost</label>
    <input id="standardCost" name="standardCost"
           type="number" value="10.00" />
  </div>
  <div class="row">
    <label for="listPrice">Price</label>
    <input id="listPrice" name="listPrice"
           type="number" value="25.00" />
  </div>
  <div class="row">
    <label for="sellStartDate">Sell Start Date</label>
    <input id="sellStartDate" name="sellStartDate"
           type="text" value="1/15/2021" />
  </div>
  <div class="row">
    <label id="message" class="infoMessage"></label>
  </div>
  <div class="row">
    <label id="error" class="errorMessage"></label>
  </div>
  <div class="row">
    <button type="button" onclick="get();">
      Get Products
    </button>
    <button type="button" onclick="getProduct();">
      Get a Product
    </button>
    <button type="button" onclick="insertProduct();">
      Insert Product
    </button>
    <button type="button" onclick="updateProduct();">
      Update Product
    </button>
    <button type="button" onclick="deleteProduct();">
      Delete Product
    </button>
  </div>
</form>
Modify Script on Page
You added more buttons in the index page, so you need to add functions to correspond to each button's click event. Modify the code in the <script> tag to look like Listing 5.
<script>
  'use strict';

  const URL = "http://localhost:5000/api/product";

  function get() {
    let req = new XMLHttpRequest();
    req.onreadystatechange = function () {
      if (this.readyState === XMLHttpRequest.DONE &&
          this.status === 200) {
        console.log(this.response);
        displayMessage("Products Retrieved");
      }
    };
    req.open("GET", URL);
    req.send();
  }

  function getProduct() {

  }

  function insertProduct() {

  }

  function updateProduct() {

  }

  function deleteProduct() {

  }
</script>
Add Helper Functions into Scripts Folder
As with most applications, you are going to have some generic functions that you can reuse on many web pages. To make them easy to reuse create a ajax-common.js file into which you may place these functions. You then put this file into a folder that you can reference from any page(s) that need them. Create a file named ajax-common.js in the \wwwroot\js folder. Into this file create three functions; getValue(), setValue() and handleAjaxError().
Add getValue() Helper Function
Each time you want to retrieve data from an input field using JavaScript you use the document.getElementById("productID").value for example. This is a lot of typing for each field, so add a simple helper function within the ajax-common.js file to perform this service for us.
function getValue(id) {
  return document.getElementById(id).value;
}
Add setValue() Helper Function
To place data into an input field using JavaScript you use the code document.getElementById("productID").value = "data". This is a lot of typing for each field, so add a simple helper function within the ajax-common.js file to perform this service for us.
function setValue(id, value) {
  document.getElementById(id).value = value;
}
Add displayMessage() Helper Function
In the <form> you added to the index page is a <label> with an id of message where you can display informational messages to the user. Create a function named displayMessage() in the ajax-common.js file to which you can pass a message to display as shown in the following code.
function displayMessage(msg) {
  document.getElementById("message").innerHTML = msg;
}
Add displayError() Helper Function
In the <form> you added to the index page is a <label> with an id of error where you can display error information to the user. Create a function named displayError () in the ajax-common.js file to which you can pass an error object to display as shown in the following code.
function displayError(error) {
  document.getElementById("error").innerHTML =
    JSON.stringify(error);
}
Add handleAjaxError() Helper Function
Ajax errors can generally be handled by a common piece of code as shown in Listing 6. Add this function into the ajax-common.js file. Don't worry about what it does for now, you learn more about this function in a later blog post.
function handleAjaxError(error) {
  displayError(error);

  switch (error.status) {
    case 404:
      console.log(error.responseText);
      break;
    case 500:
      console.log(error.responseText);
      break;
    default:
      console.log(error);
      break;
  }
}
Add Product Helper Functions
Just like you have common functions for any page, you are going to have some functions that just deal with the product data. Add a file into the \wwwroot\js folder named product.js. Add three functions into this file named getFromInput(), setInput() and clearInput().
Add getFromInput() Helper Function
Create a method called getFromInput() to create a product object. This product object should have the exact same property names as the C# entity class you created in the Web API project. The property names can be camel-case because you added the code in the Startup class to convert the names from camel-case to pascal case.
function getFromInput() {
  return {
    "productID": getValue("productID"),
    "name": getValue("name"),
    "productNumber": getValue("productNumber"),
    "color": getValue("color"),
    "standardCost": getValue("standardCost"),
    "listPrice": getValue("listPrice"),
    "sellStartDate": new Date(getValue("sellStartDate"))
  };
}
Add setInput() Helper Function
When a product is returned from the Web API, you need to place each property in the product class into each input field. Create a function called setInput() in the product.js file to perform this operation.
function setInput(product) {
  setValue("productID", product.productID);
  setValue("name", product.name);
  setValue("productNumber", product.productNumber);
  setValue("color", product.color);
  setValue("standardCost", product.standardCost);
  setValue("listPrice", product.listPrice);
  setValue("sellStartDate", product.sellStartDate);
}
Add clearInput() Helper Function
After deleting a product, or if you wish to clear the data before the user begins to add a new product, create a function called clearInput() to set each input field to a default value.
function clearInput() {
  setValue("productID", "0");
  setValue("name", "");
  setValue("productNumber", "");
  setValue("color", "");
  setValue("standardCost", "0");
  setValue("listPrice", "0");
  setValue("sellStartDate", new Date().toLocaleDateString());
}
Reference Scripts from Index Page
To use these .js files on your pages, you need to reference them using a <script> tag. Add two <script> tags shown in the code below just before the <script> tag in the index page.
<script src="/js/ajax-common.js"></script>
<script src="/js/product.js"></script>
Summary
In this blog post you built a web server to serve web pages and JSON files. You learned the basics of writing Ajax code using the XMLHttpRequest object that is built-in to all browsers for communicating between a web page to a web server.
#dotnet #ajax #mvc #webapi #dotnetcore #pauldsheriff #development #programming