User's frequently want the ability to upload files to a website. If you are using MVC and Bootstrap, you know that the normal file upload control does not look like the rest of your bootstrapped controls. In this blog post you are going to learn how to modify the default look and feel with a couple of other looks to make the file upload control match the rest of the bootstrap styled HTML.
Styling the File Upload Control
The default look and feel for the <input type="file"> looks like that shown in Figure 1. As you can see, the button part of the file input does not look like the other bootstrap buttons.
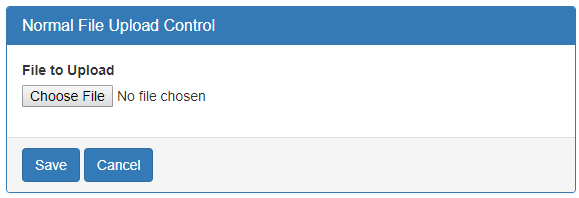
Before you learn to style this control, let's look at the HTML used to build the panel and file upload control shown in Figure 1. The HTML below is what you type in to create the page shown in Figure 1.
@using (@Html.BeginForm(null, null, FormMethod.Post,
        new { enctype = "multipart/form-data" })) {
  <div class="row">
    <div class="col-xs-12">
      <div class="panel panel-primary">
        <div class="panel-heading">
          <h1 class="panel-title">Normal File Upload Control</h1>
        </div>
        <div class="panel-body">
          <div class="form-group">
            <label for="fileToUpload">File to Upload</label>
            @Html.TextBox("fileToUpload", null, new { type="file" })
          </div>
        </div>
        <div class="panel-footer">
          <button type="submit" id="btnSave"
                  class="btn btn-primary">Save</button>
          <a href='@Url.Action("Index", "Home")'
             class="btn btn-primary">Cancel</a>
        </div>
      </div>
    </div>
  </div>
}
If you are familiar with Bootstrap, there is nothing new here. However, the MVC @Html.BeginForm() control does change the 'enctype' attribute to 'multipart/form-data'. This attribute is required for the MVC controller to be able to receive the input stream for the file to upload. The code to perform the upload is shown a little later in this blog post.
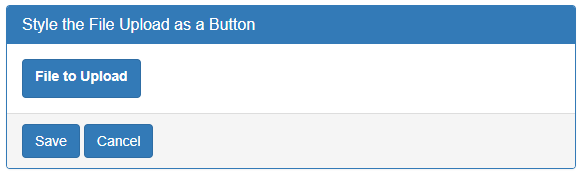
Style the File Upload Control as a Button
If you do a google search for how to style the file upload control, you will find many examples. I want the look and feel of my file upload control to match all the rest of my bootstrap controls, so this first sample makes it look like a bootstrap button as shown in Figure 2.0
To accomplish this, I did not need any additional CSS, I simply needed to set the style of the file upload control to "display:none;". This turns off the display of the control but does not remove the functionality. The second thing I did was to add the "btn btn-primary" styles to the form-group that wraps the label and the input field. That is all there is to it!
<div class="form-group btn btn-primary">
  <label for="fileToUpload">File to Upload</label>
  @Html.TextBox("fileToUpload", null,
                new { type = "file", style = "display:none;" })
</div>
<div id="fileDisplay" class="text-info"></div>
To display the file chosen after the user selects a file, a new div is added with an id set to "fileDisplay". In the <script> tag at the end of the page, add the following code to respond to the change event of the file upload control.
<script>
  $(document).on('change', ':file', function (e) {
    $("#fileDisplay").text(e.target.value);
  });
</script>
The code above takes the value from the file upload control and adds it to the text of the <div> tag. The value property in the file upload control contains the name of the file chosen by the user.
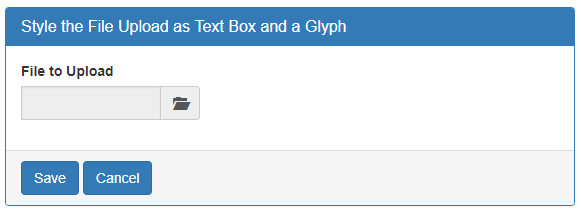
Style the File Upload Control as a Text Box and a Glyph
Instead of a button, you might wish to make your file upload control look like a read-only text box and an open folder as shown in Figure 3. What is nice about this design is the file chosen can be displayed in the text box portion.
To create this look and feel, use built-in bootstrap classes just like before. The HTML below is what is used within the body of the bootstrap panel.
<div class="form-group">
  <label for="fileToUpload">File to Upload</label>
  <div class="input-group col-xs-4">
    @Html.TextBox("fileToUpload", null,
        new { type = "file", style = "display:none;" })
    <input id="fileDisplay" type="text"
           class="form-control"
           readonly="readonly"
           onfocus="fileUploadClick();" />
    <div class="input-group-addon"
          onclick="fileUploadClick();">
      <span class="glyphicon glyphicon-folder-open"></span>
    </div>
  </div>
</div>
Within the form-group div, add a normal label control. Then add another div with the class "input-group" and any column width you want. Within this div add your file upload control with the style set to "display:none;" as you did before. Next, you add a text control and a div just like you would with any bootstrap input group. Add the "readonly" attribute to the text box and add the class of "form-control". Call a function you are going to write named "fileUploadClick()" in response to the onfocus event. Add the class "input-group-addon" to the next div, and in response to the onclick event, call the "fileUploadClick()" function as well. Within the div add a span and use any glyphicon you want to represent to the user that this is a control to upload a file.
Within the <script> tag at the bottom of the page, add the new fileUploadClick() function. This new function simply triggers the click event on the file upload control. The click event displays a file open dialog. If the user chooses a file, that file name is displayed in the read-only text box.
<
<script>
  $(document).on('change', ':file', function (e) {
    $("#fileDisplay").val(e.target.value);
  });

  function fileUploadClick() {
    $("#fileToUpload").trigger("click");
  }
</script>
Code to Upload File
Now that you have a seen how to style your file upload control, let's now learn how to get the file from the client to the server. In the web page you created before, you only have one <input> to send to the server. In your MVC controller's POST method you accept a HttpPostedFileBase object. The name of the parameter must match the same id/name you use in the HTML when creating the <input type="file">.
The code shown below is going to attempt to gather the contents of the file as a byte array, the path of the file, the name of the file, the length of the contents and the type of the file (jpg, gif, docx, etc). Check to see if the fileToUpload parameter is not null and that the content length property is greater than zero. This tells you a valid file has been uploaded. Next, create a MemoryStream object and use the InputStream CopyTo() method to copy the uploaded file to the memory stream object.
[HttpPost]
public ActionResult Sample01(HttpPostedFileBase fileToUpload)
{
  byte[] contents;
  string filePath;
  string fileName;
  int contentLength;
  string contentType;

  if (fileToUpload != null && fileToUpload.ContentLength > 0) {
    // Get the uploaded file
    using (MemoryStream ms = new MemoryStream()) {
      fileToUpload.InputStream.CopyTo(ms);
      contents = ms.ToArray();
    }

    // Fill in other file information
    contentLength = fileToUpload.ContentLength;
    contentType = fileToUpload.ContentType;
    filePath = Path.GetDirectoryName(fileToUpload.FileName);
    fileName = Path.GetFileName(fileToUpload.FileName);

    // Look at all properties
    System.Diagnostics.Debugger.Break();

    // TODO: Do something with the file data
  }

  return View();
}
Once you have the file uploaded, gather the other property data from the HttpPostedFileBase object and put it into the local variables in this method. The FileName property may or may not have the path from the client machine as not all browsers pass this information to the server. Use the .NET Path class' GetDirectoryName() method to attempt to extract the path. Then use the .NET Path class' GetFileName() method to extract the file name from the FileName property.
You are not going to do anything with all these values right now other than look at them to ensure you received the file you attempted to upload. Later in this blog series you are going to use these values to store the file to a folder on the server and store the file information into an SQL Server table. Be aware that most servers impose a limit on the size of the file you can upload. However, they also let you adjust the size by changing a configuration setting.
Summary
You do not have to settle for the default look and feel of the HTML file upload control. By simply turning off the style of the file upload control, you can style it in anyway you see fit. In this blog post you learned to use bootstrap styles to make it look like a button. You also learned to use an input group and use a text box and a glyph icon. With just a little JavaScript you can report back on the file name chosen from the styled input control. You also learned the C# code to write in the MVC controller to retrieve the contents of the file.